Sprite Animation with Doug
Hello everyone, Doug here! I wear a lot of hats for Advent of the Reaper, including being the creator of the story, the game designer, and one of the pixel artists for the game! This month I’ll be pulling back the curtain and running through my process for a single combat animation. Even though the combat is not interactive in this genre of game (or perhaps especially for that reason), our combat animations need to be quick, appealing, and exciting to keep the player engaged. Let’s dive in!
A Little Background: How’d We Get Here?
I’ve been animating in some form or another since middle school. When I first started, I was using a program called Paint Shop Pro and primarily making custom animations from existing sprite sheets, particularly those from the Mega Man franchise. In high school, I discovered Adobe Flash and started making more hand-drawn — or mouse-drawn, at the time — 2D cartoons. In college, I earned a degree in Visual Arts with an animation focus, where I was introduced to both 3D and more modern 2D animation techniques. This was when some of the earliest concepts of Advent’s story started to take root, and I had envisioned Advent becoming an animated series. Fast forward ten years and I’d changed careers entirely, with Advent being long-shelved as a cool project I’d more or less resigned to never giving serious attention again. When the COVID-19 pandemic shut the world down, I found myself dusting off the story through the new lens of an indie game project. Now armed with Aseprite and a proper drawing tablet, it’s been very rewarding to stretch my animator legs once again!
A Little More Background: Inspiration
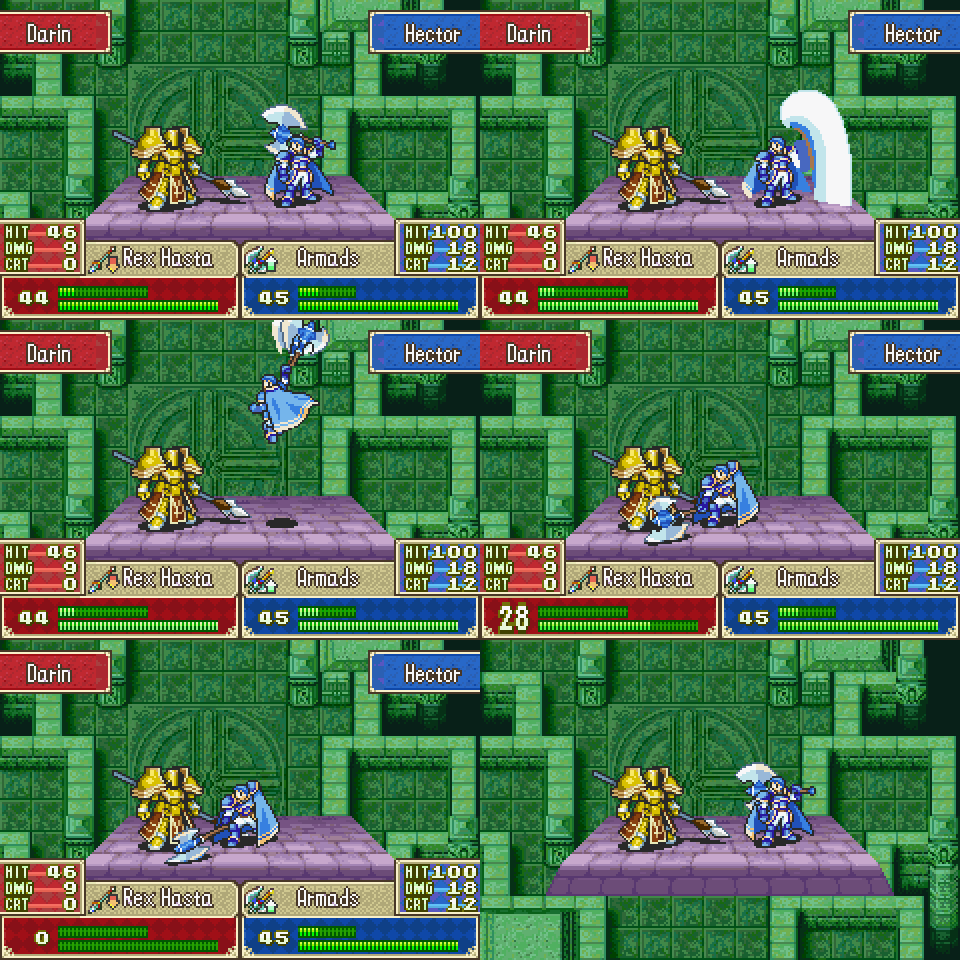
All artists need inspiration! It was quickly determined that Advent of the Reaper was most directly inspired by the Game Boy Advance (GBA) era Fire Emblem titles, and that laid much of the groundwork for our combat animation style as well. The combat animations from Fire Emblem 7 in particular (the first FE game brought to the West) had been an inspiration to me since my high school days. I mean, check this out:
Hector’s Great Lord critical hit with the legendary axe, Armads, in GBA’s Fire Emblem 7
That is some spicy pixel art action! Of course, that game is 20 years old now (I know, it hurt me just to type that), and a lot of other amazing pixel art games both new and old have also served as inspiration. For the split-screen style animation that we’re using, I also point to Wargroove and Advance Wars (GBA) for great contained, non-interactive combat animations.
Okay, enough build-up! What are we actually looking at today?!
Thanks for bearing with me! We’re going to delve into my process for Elira’s (Non-Ascend) Critical Hit animation. Take a look at the finished product:
Elira’s Non-Ascend Critical Hit Animation
The motion of this animation actually changed quite a bit from its initial concept, and I think it’s important to include the original version. It sucks having to throw out or shelve what you thought was a great idea — but it’s important to be willing to let your artistic ideas evolve and change for the best possible final result!
Pre-Planning: Prior to the First Pixel
When I’m trying to figure out what looks good for a more elaborate movement animation, there are a few steps I consider rather than just visualizing and trying to churn it out. Not planning the movement properly can make the animation turn out weird, requiring it to be scrapped halfway through — or as you’ll see in my case, sometimes that happens even with planning. My first idea for the “anticipation” phase of this animation was having Elira do a little twirl while moving backwards slightly, to give her more room for the actual attack animation. She would then lunge forward, launch into the air, and spin-flip back to her idle pose. I started by sketching the twirl motion with stick figures:
Only the finest quality stick figures for Advent
Because this movement involved a 360-degree rotation of a 2D character, I was still not confident I was ready to successfully capture the movement of the twirl. I used a Figma — an anime-style action figure which I’ll occasionally employ for pose reference — and took photos of the steps of the twirl to better visualize it:
Elira’s stunt double featuring The Invisible Scythe™
At this point, I decided it was time to head into Aseprite.
Keyframing and Motion Refinement
In animation, a “keyframe” is a critical frame in the motion, or the sprite in our case, and “in-between” frames smoothly tie those keyframes together. If you were to view just keyframes, you could easily follow what’s happening, but it would be stuttered, lacking the fluid motion of a complete animation. For those not familiar with pixel art, a “sprite” is a single frame of pixel animation (referring to a specific character or object, not an assembled or composited scene which is made up of multiple sprites). Here was the first wireframe pass at Elira’s critical hit keyframe sprites. The different body parts are brightly color-coded to easily keep track of them as the body changes its 3D orientation. You may also note the neon green lines and dots towards the bottom of the screen; this approximates the center of the screen and the placement of the opposing enemy sprite for reference.
The first attempt at capturing the movements
Next, starting with the idle frame, I started filling in the subsequent keyframes with actual sprites. At this stage, I was still proceeding with the backwards twirl + cartwheel-esque wide flip motion to return to idle:
Starting to add sprites over the wireframe
Unfortunately, something wasn’t feeling right even at this stage. I made my first change to the motion with the next iteration, switching the full cartwheel to a tight midair spin before the return to idle. You can see I needed to extend the animation stage vertically to accommodate the midair movement:
Updating the follow-through keyframes
At this point, I realized that the twirl at the beginning of the animation just wasn’t working. I wasn't gaining enough of a payoff by including what was already a difficult motion to animate. So even after all that planning, it was time to cut it! At the next pass, I swapped that anticipation motion to having Elira dramatically spin her scythe in place, and I could tell I had finally hit the right level of excitement:
Replacing the anticipation keyframes
With one more iteration for the landing sprites, I had completed the keyframes and was very pleased with the overall animation that resulted:
All wireframe sprites replaced and ready to polish!
With the hardest part of the animation behind me, it was time to clean things up!
Finishing Up: In-Betweening and Polish
A shot of my (attempted) layer organization in Aseprite
At this stage, I start refining and adding details to individual parts and/or layers of the animation to bring it closer to a finished product. I had a lot of layers to manage — I can’t tell you how many times I’d make some adjustment on the wrong layer throughout this process! In this next pass, I cleaned up the scythe and some of the details on Elira’s outfit, as well as added the first versions of the smears:
Nearly there!
What’s a smear, you ask? This is a term I first heard from another animator, referring to the use of blurred or distorted frames to communicate a large amount of motion in a short amount of time. A smear could be on an entire body or just a body part/object. If you didn’t pay any particular notice to them before, keep an eye out — I’ll guarantee you’ll start seeing them across all sorts of animation now! There are times where a smear feels like cheating, but as far as 2D pixel art goes, I find them to be one of the most effective techniques to make really cool motion effects.
One of two large smears used in the critical hit animation
From there, the final touches involved animating Elira’s hair, scarves, and any other small details I missed up to that point. Below is the final version of the animation (which you saw at the beginning of this post). When I create a final version to share on social media, for example, I use a semi-transparent reflection effect on the ground for some extra pizzazz:
The final animation!
And of course, this animation really shines in-game as well:
In-Game Footage of Elira’s Critical Hit
Conclusion
Well, that about wraps it up for this month. I hope you found that trip through my animation process entertaining, and maybe learned something! If you enjoy this type of content, including the post from Yolie about her pixel art last month, you’re in luck! We’ve got a lot of talented artists working on Advent, and we’re excited to feature them in future blog posts. Until next time!
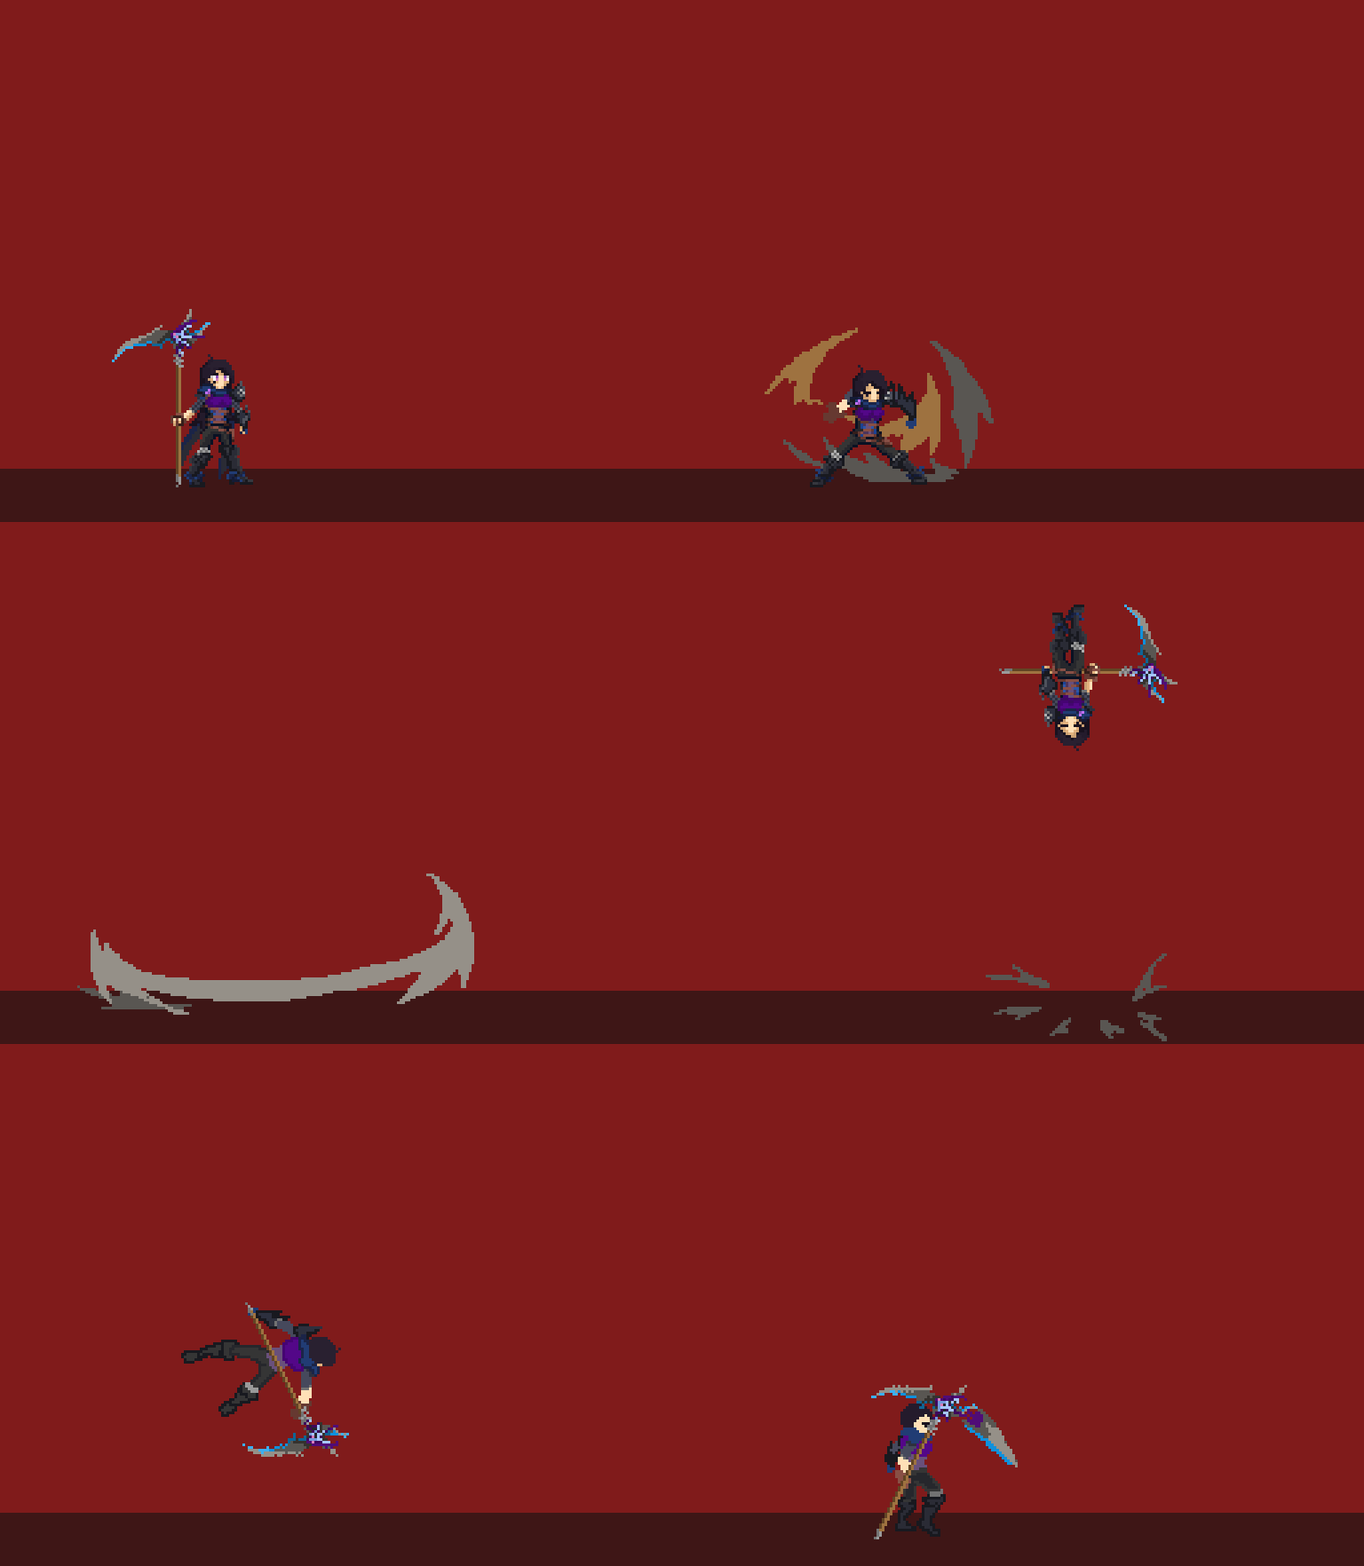
A composite of all of the animation frames!
SIGN UP FOR OUR NEWSLETTER
Go behind the scenes of our game development, get sneak peeks at art, and find us at events


